Showing posts with label Asian. Show all posts

Friday, December 22, 2017

Vegan Pot-stickers, Plant-based No Added Fat

Vegan Pot-stickers without frying
Alton Brown has a recipe for Vegetarian Steamed Dumplings that I used to create the Pot stickers, but I removed the egg, sesame oil, scallions and red pepper for health and allergy reasons.  If you aren't allergic to onions and peppers then add the pepper and scallions back in (2 tbsp Each).

Filling ingredients:
1/2 pound firm tofu, pressed to remove excess water
1/2 cup coarsely grated carrots
1/2 cup shredded cabbage
1/2 cup chopped mushrooms
1 tsp finely minced fresh ginger
1 tbsp fresh cilantro, chopped
1 tbsp soy sauce
1 tbsp hoisin sauce
A few drops sesame oil, optional
1 tsp Ener-G egg replacer powder
Dash each of salt and pepper

1 package of round dumpling skins, also called gyoza (preferably twin dragon brand)
Small bowl of water for wetting fingers

First step:
Press the 1/2 pound of tofu to remove excess water by taking 2 or 3 paper towels and folding into a pad the same size or slightly larger than your block of tofu.  Put the tofu on the paper towels and make another pad of paper towels to put over the top.  Place a plate or other flat surface on this and then weigh it down with a can of something, like a 32 ounce can of crushed tomatoes, etc.
Let this sit for at least 20 minutes while you gather the other ingredients together and toss them into a large bowl.  After the tofu has been pressed, slice into 1/4" cubes and toss with other ingredients.

Next step:
Heat two large heavy non-stick skillets to medium, without oil.  While these are warming up, make your potstickers by placing one skin on a flat surface and mounding about 2 teaspoons of the filling mixture onto it.  Wet your finger and run it along 1/2 the circumference of the skin, then fold that half to meet the opposite edge and pinch the edges together to shut it tight.  Now you should have a dumpling or potsticker that is in the shape of the letter "D".
Continue to make these while listening to your favorite jazz music, for cooking I like Steve Tyrell and Diana Krall.  Even if it is not Friday.
When you have enough to cover the bottom of a skillet, spray that skillet with a really light coating of olive oil spray before placing potstickers in it.  (*I have found that the canned Olive Oil Spray by Crisco puts out a much finer mist than Pam!  Who knew?)  Immediately cover with lid and make some more potstickers for the other pan.  If anyones else is home they will eat them as fast as you can make them is why I suggest two pans instead of one.  Also, you don't want to be standing there all day over one measly little pan.
After a few minutes, when the top looks transluscent and if you lift the corner of one and see a golden brown color, add enough water to just cover the bottom of the pan, about 1/8" deep.  Immediately place lid back on and steam until water has evaporated.  Remove the potstickers from the skillet and onto a plate.  Keep them warm by inverting a second plate over the top.

Friday, April 1, 2016

Almond Chicken for the plant based diet

Soy curls made to taste like Almond Chicken on a bed of steamed kale

No chickens died in the making of this meal.

A plant based version of the standard American Chinese Restaurant "Almond Chicken"
Ingredients:

1 cup              soy curls
1 cup              boiling water
1 teaspoon Better Than Bouillon, No Chicken Base
2 tablespoons Sliced almonds
1/4 cup almond flour
(or grind up your whole almonds with a food processor)
1/4 cup flaxseed meal
1/4 cup bread crumbs (whole grain, dry)
1 cup water
1/2 cup almond flour
1/2 cup almond milk, lowfat
1 tablespoon soy sauce
2 tablespoons garbanzo bean flour
1/2 teaspoon Better Than Bouillon, No Chicken Base
1/8 teaspoon almond extract (optional)
1 tablespoon Miso paste
1 bunch steamed kale 
1.  Dissolve 1 teaspoon of bouillon in 1 cup of boiling water and pour over soy curls to dehydrate.  Let sit for 15 min. or longer while you prepare the other ingredients.
2.  Toast sliced almonds in small skillet until golden brown, set aside to use as topping.
3.  Toast 1/4 cup almond flour (ground almonds), then combine with flaxseed meal and bread crumbs.
4.  Drain broth from soy curls and reserve.  Dredge soy curls in almond flour mixture.
5.  Toast coated soy curls in medium-hot skillet until browned on all sides.  Set aside in warm oven.
6.  Combine sauce ingredients (1 cup water, 1/2 cup almond flour, 1/2 cup almond milk, 1 tablespoon soy sauce, garbanzo bean flour and 1/2 teaspoon bouillon) in blender or Magic Bullet.
7.  Pour sauce ingredients into skillet and bring to simmer, cook until thickened.  Remove from heat and add almond extract and miso paste, stir to combine.
8.  Place 1 cup of steamed kale or brown rice and 1/4 of the soy curls on each plate, cover with the almond sauce and sprinkle toasted sliced almonds over the top.


8.  Remember to close your eyes with each bite, sigh and be happy and grateful to be alive.  Bless the cook.  Don't bother wiping the grin off your face.

x

Friday, July 12, 2013

Thai Peanut Noodle Recipe, low fat, vegan style with PB2 powder


Plant-based Pad Thai


Noodles!
A lot of the recipes I use are based on a tomato type of sauce and sometimes I want a little something different.  This recipe is a version I derived from "Julie's Peanut Sesame Noodles" at www.everydaydish.tv/index.php?page=recipe&recipe=119.   I am sure her version tastes wonderful but since I don't want so much fat and must avoid onions I made a few little changes…..:)

This recipe is one of the most popular that I have blogged. I hope you just love it!  It's one of our favorites.

Thai Peanut Noodles or "Vegan Pad Thai"


1 pound whole grain linguine such as brown rice type

Sauce:
1 cup dry peanut butter powder (PB2)
1/4 cup low sodium soy sauce
3/4 cup warm water
1 inch piece of fresh ginger, peeled and grated or diced fine
4 cloves garlic, diced fine
6 tablespoons rice vinegar
1 teaspoon toasted sesame oil (omit to decrease fat)
2 teaspoons sweetener such as agave nectar
1 1/2 teaspoons siracha sauce  (bump this up if you like food really spicy)
3 tablespoons flaxseed meal

Other ingredients to add at the end:
1 pre-packaged coleslaw mix, (without the dressing) or 4 cups shredded cabbage
2 cups fresh spinach, baby leaves or regular leaves cut into bite size pieces
1 cup fresh mung bean sprouts or 1 cup steamed asparagus, or broccoli, etc.
3/4 cup chopped fresh cilantro
1 cup diced grilled tofu, optional
2 teaspoons toasted sesame seeds (toast them in a medium hot non-stick skillet until golden)
   
Steps:
1.  In a large pot, boil the noodles until al dente. Drain but don't rinse.  Place in large bowl.
2.  While the noodles are boiling, put all the sauce ingredients into blender and blend away for a minute.  Let this sit for a few minutes while the flaxseed helps it to thicken up.
3.  Pour peanut sauce over noodles and other ingredients, toss well to coat.
4.  This works as a hot dish or later as a cold noodle salad.

Serves-8

Note:  The longer we are on a plant based diet, the less sweet and salty I seem to like in my recipes.  I have gone back twice now and decreased the amount of soy sauce and sweetener in this recipe to adjust it to my ever-changing tastes.


Tuesday, July 9, 2013

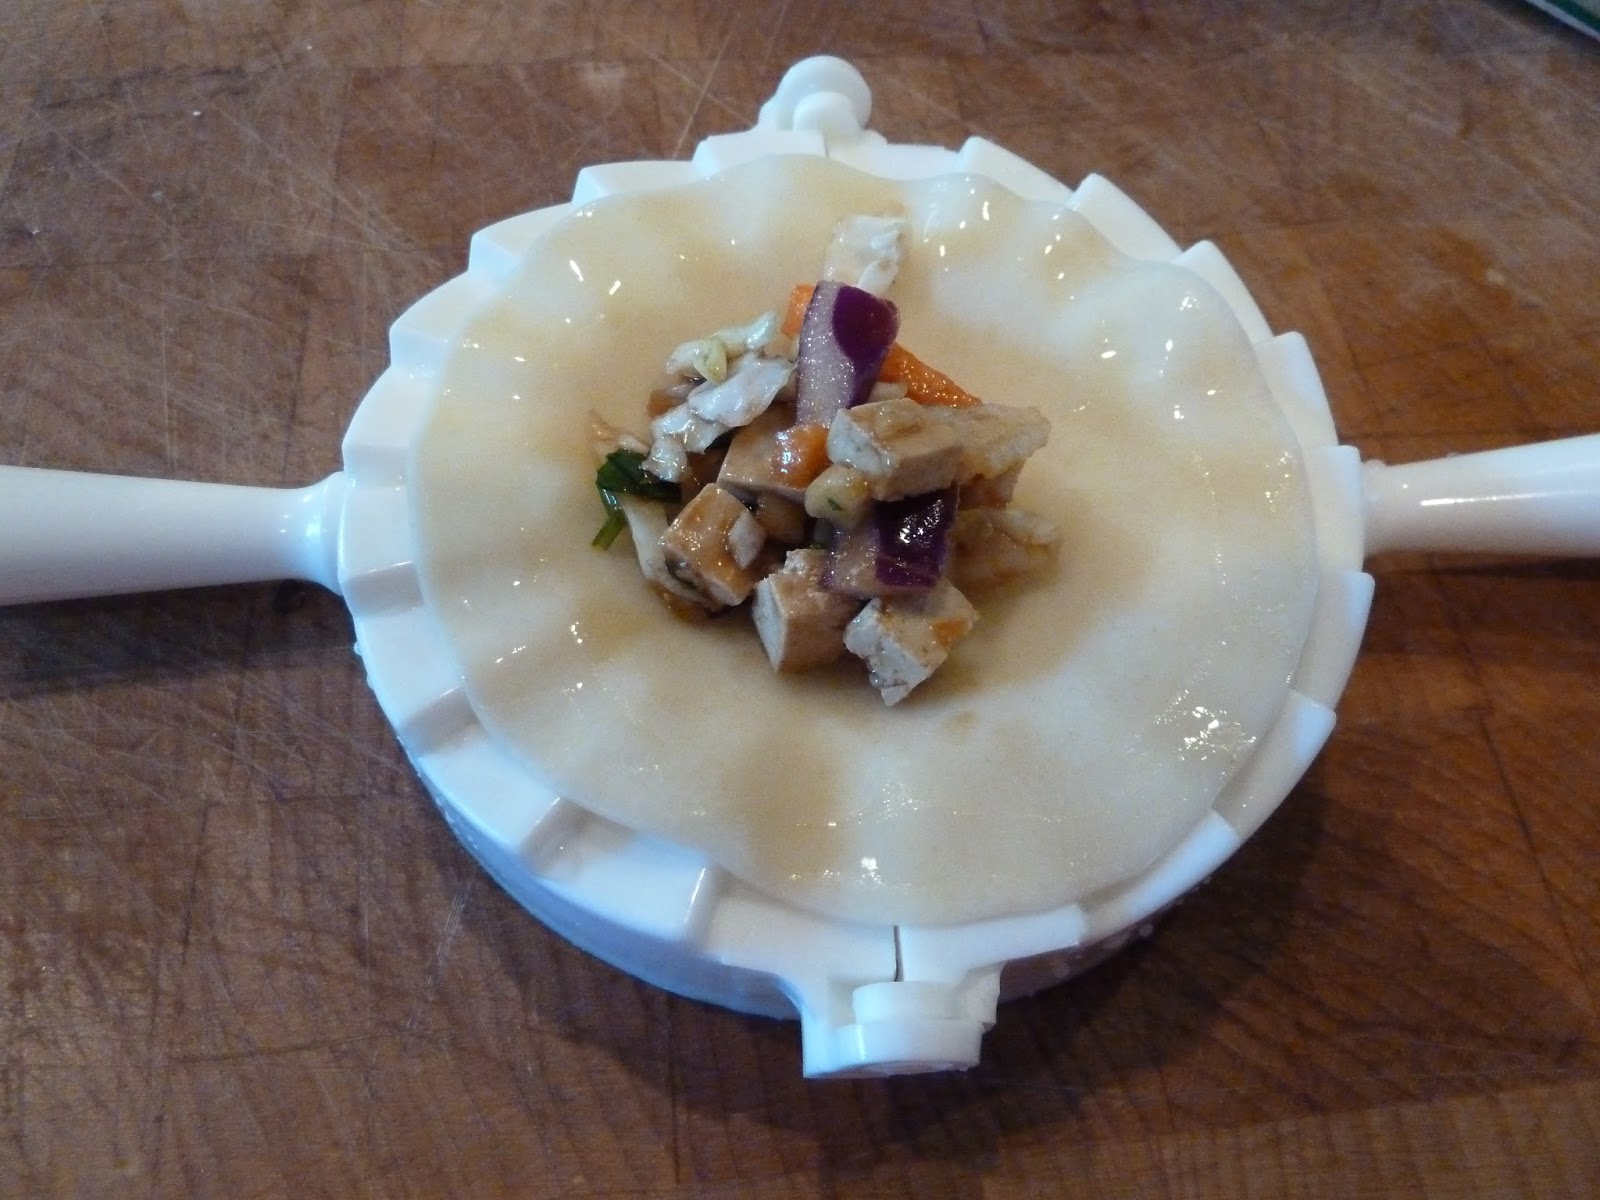
New Potsticker Toy or Asian Dumpling Maker

A couple of weeks ago I went for a motorcycle ride with my husband and we ended up in Walla Walla,  WA.  Yes, that's a real place.
I am famous around our house for not really enjoying the riding of motorcycles but once in a while I go along and as time passes in my life, I have to admit I enjoy riding more now than I used to, but not at freeway speeds.  My little Honda Rebel and I do just fine keeping it under 50 mph thank you.

So to appease me, my husband was more than happy to go shopping with me while in Walla Walla.  They have some great little stores, one of which is a kitchen shop I like: Providence Fine Living at 16 East Main Street is wonderful and I try to support small business because, you know, I am a giver.

Anyway, their shop window is always fresh and inviting and I enjoy just perusing the merchandise.  I came upon a gadget to make the preparation of pot stickers go a little faster than usual and the result is a bit more professional.  It is called an Asian Dumpling Maker.
As you know, sometimes kitchen gadgets can be a gamble and many end up in the draw unused.  Shhhh, don't tell.  But this is truly blog-worthy so here goes:


Filling ingredients:
1/2 pound firm tofu, pressed to remove excess water
1/2 cup coarsely grated carrots
1/2 cup shredded cabbage
1/2 cup chopped mushrooms
1 tsp finely minced fresh ginger
1 tbsp fresh cilantro, chopped
1 tbsp soy sauce
1 tbsp hoisin sauce
A few drops sesame oil, optional
1 tsp Ener-G egg replacer powder
Dash each of salt and pepper

1 package of round dumpling skins, also called gyoza (preferably twin dragon brand)
Small bowl of water for wetting fingers

First step:
Press the 1/2 pound of tofu to remove excess water by taking 2 or 3 paper towels and folding into a pad the same size or slightly larger than your block of tofu.  Put the tofu on the paper towels and make another pad of paper towels to put over the top.  Place a plate or other flat surface on this and then weigh it down with a can of something, like a 32 ounce can of crushed tomatoes, etc.
Let this sit for at least 20 minutes while you gather the other ingredients together and toss them into a large bowl.  After the tofu has been pressed, slice into 1/4" cubes and toss with other ingredients.

Next step:
Heat two large heavy non-stick skillets to medium, without oil.  While these are warming up, make your potstickers by placing one skin on a flat surface or dumpling press and mounding about 1 teaspoon of the filling mixture onto it.  Wet your finger and run it along 1/2 the circumference of the skin, then fold that half to meet the opposite edge and pinch the edges together to shut it tight.  Now you should have a dumpling or potsticker that is in the shape of the letter "D".
Continue to make these while listening to your favorite jazz music, for cooking I like Steve Tyrell and Diana Krall.  Even if it is not Friday.
When you have enough to cover the bottom of a skillet, spray that skillet with a really light coating of olive oil spray before placing potstickers in it.  (*I have found that the canned Olive Oil Spray by Crisco puts out a much finer mist than Pam!  Who knew?)  Immediately cover with lid and make some more potstickers for the other pan.  If anyones else is home they will eat them as fast as you can make them is why I suggest two pans instead of one.  Also, you don't want to be standing there all day over one measly little pan.
After a few minutes, when the top looks transluscent and if you lift the corner of one and see a golden brown color, add enough water to just cover the bottom of the pan, about 1/8" deep.  Immediately place lid back on and steam until water has evaporated.  Remove the potstickers from the skillet and onto a plate.  Keep them warm by inverting a second plate over the top.

For the dipping sauce I like to make it easy on myself and use pre-prepared sweet n' sour sauce mixed with sweet red pepper sauce.

Monday, May 6, 2013

PB2 Peanut Sauce


Plant-based Thai Peanut Sauce Recipe:


1 cup dry peanut butter powder (PB2)
1/4 cup low sodium soy sauce
3/4 cup warm water
1 inch piece of fresh ginger, peeled and grated or diced fine
4 cloves garlic, diced fine
6 tablespoons rice vinegar
2 teaspoons toasted sesame oil
5 tablespoons sweetener
1 1/2 teaspoons siracha sauce
3 tablespoons flaxseed meal

Thursday, October 11, 2012

Plant based Fried Rice (sort of)

If you have been paying attention to all the latest nutritional news about a plant based diet then you know that to order fried rice in a restaurant is really dumb.  Fried rice has far too much oil and besides it has eggs and pork in it.
But still, sometimes foods you used to like just sound good even though you won't ever eat them again--at least not in the same way.
Here is a quick recipe to bring back a little of that fried rice experience--

Start with a cup of sliced mushrooms in a hot skillet, sprinkle with a little Bragg 24 Herb seasoning mix


Add 1/2 cup frozen mixed vegetables


Add some brown rice, pre-made (but not heated in microwave) to speed things up with 2 tablespoons of water


Add a splash of soy sauce for flavor, heat through just until mushrooms are soft and veggies aren't cold.


And goodness, this looks pretty much like a healthier version of fried rice.  


Lunchtime!


Thursday, March 29, 2012

Eggplant in Spicy Garlic Sauce

P.F. Chang's China Bistro Stir-fried Spicy Eggplant made without frying,
on a bed of kale and brown rice and red lentils.
My favorite dish at P.F. Chang's China Bistro is the Stir-fried Spicy Eggplant, but I have been wondering if it would taste as good without frying the eggplant first.  Just as I suspected, to me it tastes better!  I found one of many copy-cat recipes at "recipe secrets": http://www.recipesecrets.net/forums/recipe-exchange/31921-p-f-changs-china-bistro-stir-fried-spicy-eggplant.html.
This shouldn't be considered an extremely healthy way to eat eggplant due to the sugars in the ingredients but it isn't too bad either.  After all, we have eliminated the majority of the fat from the original recipe.

Here is my version:

1 large eggplant, peeled and cut into 1" cubes

Brown eggplant in large non-stick skillet on medium high (without any oil) until tender inside and browned on all sides.  Add sauce mixture and stir until thick, about one minute.  Serve over a bed of kale and/or brown rice with lentils.  Garnish with sesame seeds, I found black sesame seeds at the local health food store and used those for the photo.  Downright elegant.

Sauce ingredients (place into small blender):

2 large cloves of garlic minced
1 tablespoon cornstarch
1/4 cup water
2 tablespoons vegan oyster sauce
2 tablespoons low sodium tamari
1 tablespoon white vinegar
1 tablespoon date sugar
1/2 teaspoon chili paste
1/2 teaspoon ground bean sauce
1/2 teaspoon toasted sesame oil


Thursday, June 16, 2011

Recipe for Vegan Sushi Roll, Plant-based (no added fat or fish)

Vegan Sushi Roll made with grilled tofu, cucumber, mushrooms and Tofutti.

Preparation Time: 1 hour
Chill Time: 30 minutes

Ingredients:
  • 2 cups Sushi rice, or short grain or medium grain rice
  • 2 cups water
  • 4 1/2 tablespoons rice wine vinegar
  • 1 1/2 tablespoons agave nectar
  • 1 1/2 teaspoons salt
  • 4 or 5 sheets nori
  • 1 block extra firm tofu
  • 1 english cucumber
  • 6 to 9 tablespoons Tofutti non-dairy cream cheese spread
  • 5 Shiitake mushrooms
  • Wasabi paste for garnish
  • Marinade:  1/4 cup soy sauce, 1 teaspoon liquid smoke, 2 teaspoons vegan worcestershire sauce, 1/4 cup Kikkoman Teriyaki Baste and Glaze
  • Small cup of cold water for dipping your fingers into
Instructions:
  1. Prepare tofu by draining and pressing out excess moisture.  Slice into 1/4" "steaks" and place these in a shallow pan of marinade.  Let sit in refrigerator at least an hour, up to 24 hours.
  2. Prepare vinegar mixture and set aside while rice is cooking.  (Vinegar mixture: vinegar, agave nectar and salt).
  3. Simmer rice and water until water is absorbed and rice is tender, about 20 minutes.
  4. Remove rice from heat and let it sit for 5 minutes, then pour the vinegar mixture over it and stir to combine.  
  5. Place rice mixture on large jelly roll pan to cool while you prepare the other ingredients.
  6. Cut tofu into 1/4" sticks, roll until all sides are heavily coated with marinade and grill until dark.   Set aside to cool.
  7. Slice ends off the english cucumber so that it is the same length as the nori sheets.  Cut into 1/4" x 1/4" sticks and set aside.
  8. Slice mushrooms into julienne strips and set aside.
  9. When rice is about room temperature, place a nori sheet on a bamboo placemat that has been covered with a piece of plastic wrap.  Spread 1/2 cup +/- of the rice mixture on the nori, using wet fingers to really press it flat.  Leave a 3/4" strip of nori without any rice on the edge furthest from you.  You should be able to almost see through the rice to the green nori below, so don't make the rice layer too thick.
  10. On the rice covered nori, near the edge closest to you, place a line of each of your fillings, tofu, cucumber, and mushrooms.  For the cream cheese, make sure your fingers are wet and pinch off a little bit to roll into 1/4" pencil until the entire edge of your nori sheet has a strip of cream cheese running along it.
  11. Beginning with the edge closest to you, roll the sushi up into a log, using the bamboo to provide even pressure all along it.  Before you get all the way to the end, dip your finger in the water and run it along the exposed nori to act as a glue.  Finish rolling up tight and slice into 8 pieces.  Place on plate and chill while you continue making more sushi rolls.
  12. Serve with wasabi paste and watch your guests smile with delight.
Note:  I attempted this with brown rice and it just wasn't sticky enough to work.  They fell apart miserably.....